I took the Aaron Franklin Brisket Challenge, and now that you are reading this you have been tagged. It’s your turn to devote 12 hours of your life to the best first bite ever.
Here is where Post Oak Wood meets Post Malone’s “I Fall Apart.” Here is where all other food in the world lines up for second place. Here is where you earn your barbecue cooking medal.
This is the signature method of smoking brisket in Texas, the kind that keeps people coming back to Franklin Barbecue in Austin. Its owner established this process, and there is no end in sight to the popularity of his super-tender recipe and cooking style.
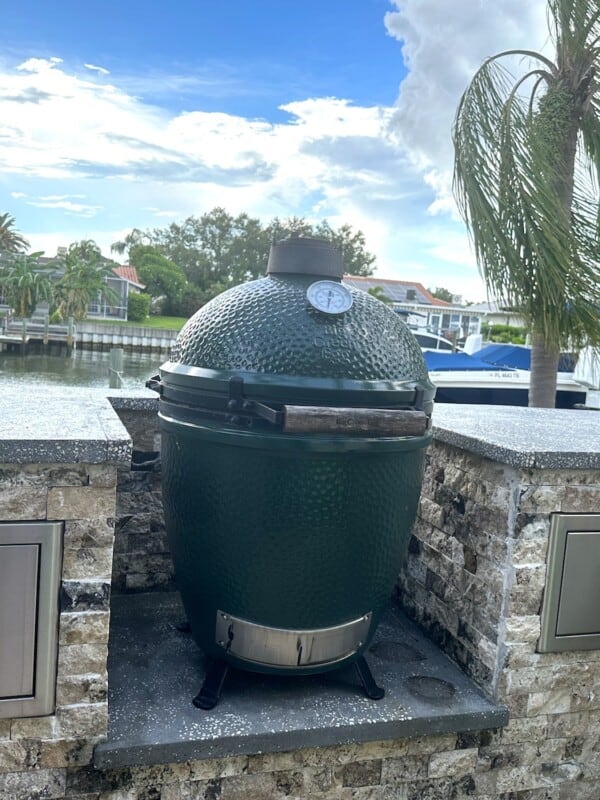
I followed Aaron’s technique by smoking a perfect 12-pound brisket on a Large Big Green Egg, starting over sunrise coffee and serving it for a late dinner after sunset.
Below you’ll find a step-by-step guide about how to find the right cut, trim, and season it correctly, build a good fire, smoke the meat, wrap and rest it, slice it properly, and spread the wealth. Figure 1.25 hours per pound of beef, and, in Franklin’s words, “Get ready to clear your schedule.”
Why all the excitement over a hunk of meat and a pitmaster?
Each steer contains eight “primal” butcher cuts: chuck, rib, loin, round, flank, short plate, shank, and brisket.
There are two briskets per steer, in the pectoral area just beneath the shoulder. They support much of the animal’s weight, so there is a lot of connective tissue and it’s a tough cut of beef. That’s why it used to be commonly disregarded and either ground up or used as stew meat.
Then it was discovered that you could smoke the brisket over low, indirect heat for many hours to slowly tenderize moist meat and render tasty fat without burning it.
Suddenly briskets became the rage, and no one has done more to spread that popularity than Franklin’s Texas-style BBQ. He uses offset steel smokers, and he wrote in his most recent book that he sources premium black Angus beef from Creekstone Farms in Arkansas City, Kansas.
Franklin’s first attempt at doing this was a bad brisket on a $99 smoker, but fortunately, he persisted and perfected the process. “You can’t worry about it,” he said in a PBS video. “It’s just a piece of meat with fire. It’s the oldest way to cook.”
Franklin turned himself into a cottage industry and owner of the nation’s hottest BBQ joint. His recipe is scattered across videos and MasterClass articles and interviews, and my goal here was to put it all on the same page.
All the Ingredients You Need for Aaron Franklin’s Brisket
- 1 whole packer brisket (11.23 pounds)
- 2 1/2 tbsp. coarse kosher salt
- 2 1/2 tbsp. coarsely ground black pepper
- Sonny’s BBQ Sweet sauce, optional on the side only
Here was the necessary equipment:
- Large Big Green Egg
- Big Green Egg Natural Oak & Hickory Lump Coal
- 6 large chunks B&B Post Oak Wood
- 1 water pan, maximum 15” long for Large Big Green Egg
- ThermoPro Dual Probe Wireless Thermometer
- Meat thermometer manual probe stick
- 1 water spritzer filled with water
- 1 roll butcher paper
- 1 curved boning knife and 1 brisket slicing blade
How to Choose the Right Cut of Beef
The brisket is made up of two different muscles: the point and the flat. The point is the larger, rounder half, with most of the fat and therefore most of the rich succulence. The flat is just that, with a less fatty composition and a complementary delicacy.
To make an Aaron Franklin brisket you want to ask the butcher for the “whole packer,” which is both point and flat, and after you slice it you want to give each diner a little from the point and a little from the flat.
When planning how much brisket is enough to go around for everyone at your next BBQ, a good rule of thumb is 1/2 pound per person. A packer-cut brisket will yield about 50-60% of its original weight depending on how you trim it in the next step.
The day before the cook, I called a handful of local butchers and soon realized that Sam’s Club ($50 for an annual membership) is my best bet for a choice of packers in the 12-pound range.
The butcher there gave me what I was looking for, a Prime-grade packer cut. Prime is the way to go, and if you want to pay a little more you can make it Prime Angus.
Tip: If you have a choice, opt for more marbling and the thickest flat possible so the leaner portion will cook at about the same rate as the big point.
I bought the packer the afternoon before smoking it, so I refrigerated it on paper towels overnight and set the alarm to get up at 5:30 and start a long day of brisket making. The schedule is cleared.
10 Steps to Make the Perfect Aaron Franklin Brisket
From the trim and rub to the removal from the cooler, there are 10 steps to follow if you want the same kind of yummy brisket that Franklin serves his legions of customers.
Step 1: Trim the Brisket
I made a pot of coffee, let the dog out, stretched, and pumped myself up for CHALLENGE TIME. First things first, take out the brisket and start trimming while it’s cold. The more it warms up, the more difficult it will be to make clean precision cuts.
There are at least a few reasons I use Grease Monkey disposable grilling gloves in these steps. As Franklin notes, it makes sure you don’t transfer food juices and particles from one item to another. They protect your hands from fatty acids and spicy ingredients. They help to an extent when handling hot surfaces and utensils. Plus, it’s easier to grip without slipping.
The brisket tastes too fatty if you don’t trim fat, and it’s too dry if you trim too much. So the general rule of thumb is about 1/4 inch of fat all around the brisket. Since I am using a large Big Green Egg, I know my diameter is 18.25 inches, so I have to trim at least two inches off the length to ensure a proper fit on the grid. No such issue if you have a Traeger smoker or Weber grill Pit Boss pellet smoker, so Franklin doesn’t trim the ends of his brisket.
Keep anything you cut, because it can be used for tallow. In my case, I just kept any trimmings that had meat on them, to give Bear a special treat at the end of the cookout!
Having watched a handful of trimming videos in advance, I would say I was about 90% prepared for this step. I should have invested in a curved boning knife like the one handed down to Franklin by his father that he uses in his video, but I got by pretty well by combining the large and small Big Green Egg brand knives I’d just bought. Make sure your blade game is ready.
Step 2: Season the Brisket
Franklin uses only coarse salt and pepper to season his briskets, mixing them together well in a shaker.
His application technique is to keep a loose wrist like a hinge and shake it all over, cupping the other hand to help it apply to the sides as well. Flip the brisket and repeat.
I improvised a bit by picking up a jar of Kinder’s seasoning called “The Blend” — which is salt, pepper, and garlic. Pat the brisket well and let it sit for 30-60 minutes while you get to work on the fire.

Step 3: Build the Fire
Franklin uses only Post Oak Wood that has been dried for 9-12 months, and he places the logs into his pit smoker.
In my case, I’m building the fire the Big Green Egg way. Go with what you know, and add Aaron Franklin’s technique in any way you can. I kept the unused fuel from the previous BBQ cookout and supplemented it with a fresh batch from my bag of Big Green Egg Natural Oak and Hickory Lump Charcoal, building it to the rim of the firebox.
I used four cubes of SpeediLight and let the fire build for about 10 minutes so the coals were ready. I then reached into a bag of B&B 100% Natural Post Oak Wood and placed six big chunks around and on top of the fire. Then I repositioned the ceramic convEGGtor plate setter on top of the fire, making sure the legs were pointing up, to allow for indirect heating.
I sat an aluminum water drip pan on that (with a wad of aluminum foil between it and the convEGGtor), and filled the pan half-full with hot water. There’s your primary moisture control for the brisket. Then I used the grid lifting tool to put the ceramic grid back in place.
Step 4: Put the Meat on the Fire
Once the temperature gauge reads about 250 degrees Fahrenheit and the billowy white smoke has given way to a thin blue smoke stream coming out of the top of the smoker, you’re ready to put on the brisket. That was 9:15 a.m. for me, and that’s about two hours later than I wanted to start, but I ran out in the morning to get the Post Oak Wood and gave extra time to the first steps just to be on the safe side.
Franklin recommends fat side up when you place the brisket on the smoker. Here’s where it depends a little bit on what kind of smoker you have. If the heat is coming from below, then you might want to put it fat side down to help avoid muscle becoming overly dry. If you’re using an offset pit smoker like Franklin where the fire is on the side, then you want to put the fatty point side closest to the fire. That will help ensure even cooking.
In my case, I’m using an oval kamado cooker and it’s renowned for even heat distribution, so I’m following Franklin’s advice of fat side up.
The trimmed brisket was a perfect fit, so I gave it a good pat. Then I inserted one of my ThermoPro wireless probes in the center of the point and closed the dome.
I’m not going to check on it for the next three hours, because “if you’re looking, you ain’t cookin’.” I realized later that I should have used the second probe for this brisket, either inserted into the flat or on the grid for accurate ambient temperature. So I just use the one probe connected to the ThermoPro base unit on the Big Green Egg table, and the EGG outside thermometer gauge.
Step 5: First Stage of Smoking for 3 Hours
I set the target temperature on the ThermoPro to 165 and the first three hours of smoking were underway.
I aimed for 260 ambient temp on the smoker per Franklin’s technique. It became quickly apparent that my Big Green Egg is going to cook a low-and-slow brisket a little faster than Franklin’s smoker, so going forward I need to make small adjustments for that.
At 11:41, or 2:30 into the cook, my ThermoPro remote flashed, indicating the brisket had already reached the 165 target temperature. Technically the beef was “done” but there was a long way to go so it could be tender because you want the collagen to eventually break down into gelatin causing the brisket to have a wobbly feel.
Step 6: Second Stage of Smoking for 3 Hours
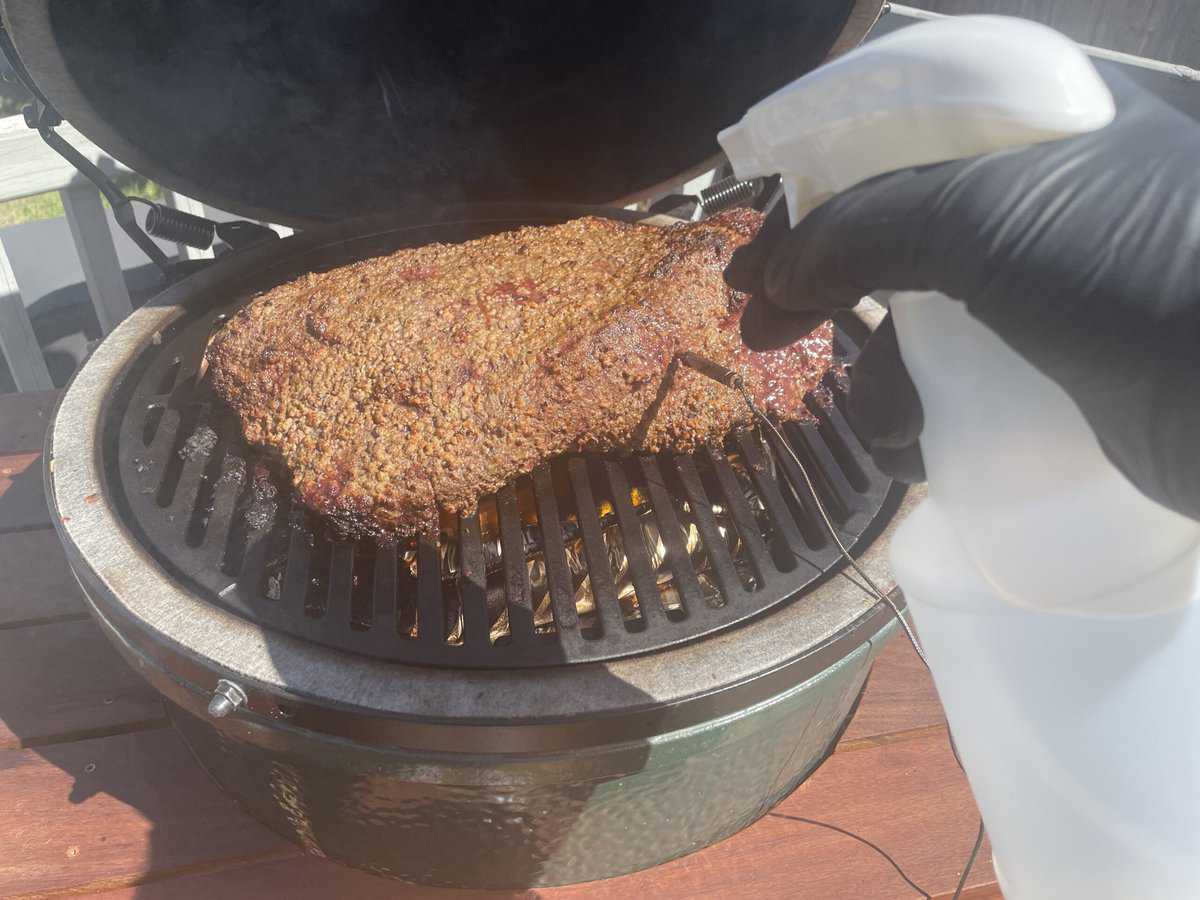
The second phase of smoking is all about moisture management. Even with the water pan, Franklin uses a spritzer once per hour in this second stage of smoking. The purpose is to spritz areas that appear drier and crispy, to keep the cook balanced.
At 12:15 I lifted the lid to reveal a mahogany hue, and a little crisping on the point and the end of the flat. I spritzed those areas especially. Will spritz each hour for the next three hours. It was 175 inside the meat at 12:30 and 265 in the EGG.
At 1:30 I noticed it starting to brown into a bark, so I spritzed dry and darkened areas. Still hard-rubbery to the touch. At 2:35, it was the first time I noticed tenderness and a little wobbliness on its own. I spritzed as the same areas were looking dry, especially the end of the flat, they looked done. The EGG temp was steady at 250, and 186 brisket temp. Anything over 180 starts to break down collagen into gelatin so I know it’s getting tender.
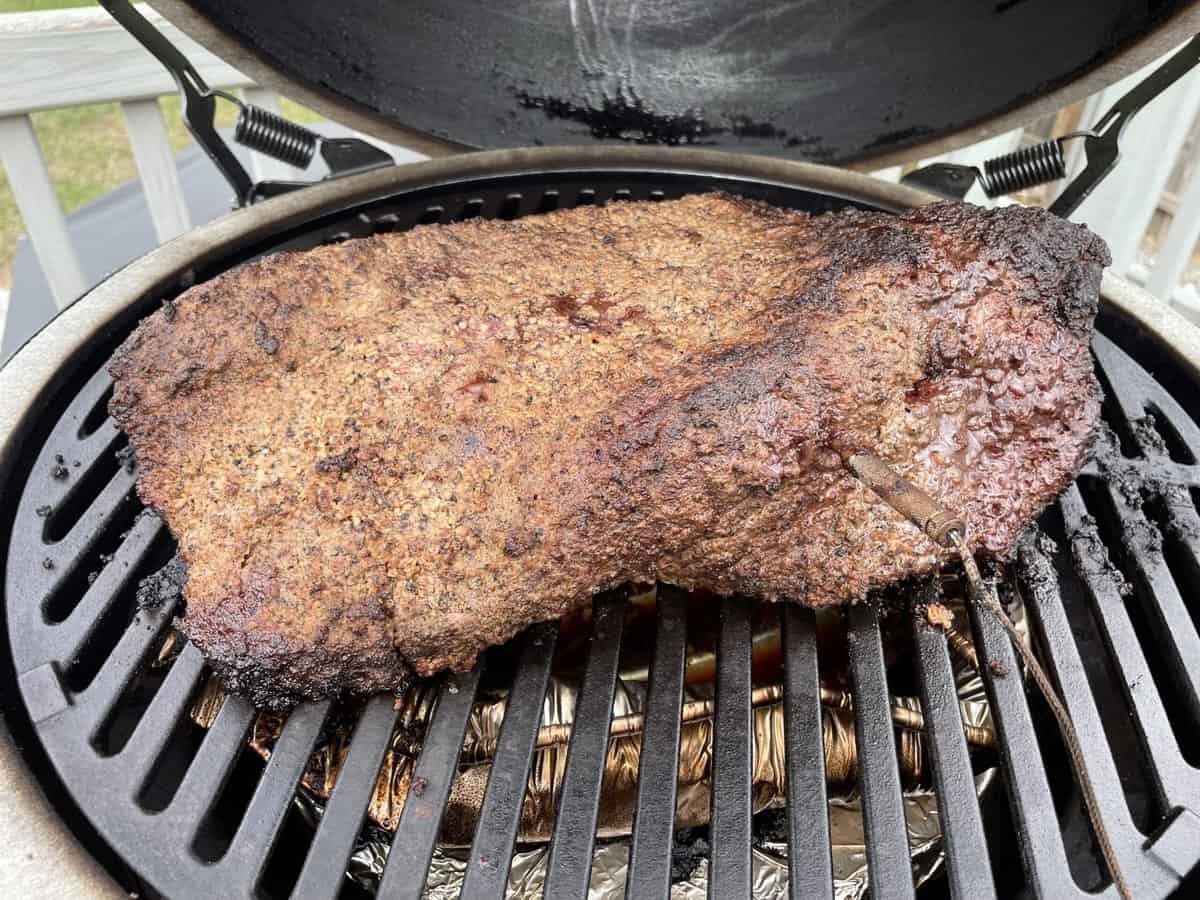
Step 7: The Stall
The “stall” is familiar to anyone who smokes meat, and here’s where it comes into play. Once you’re around 180, you’re likely in the stall. That’s when the meat is trying to push out the moisture. Following Franklin’s gameplan you normally would bump up the temperature to around 300 at this point and get it past the stall.
In my case, it was 3:15 p.m. and I probably was already well into the stall. At this point, I’m just going to bump the EGG temperature up to 285 after another spritz, and then look for my brisket-happy place between 200-210 degrees internal meat temperature.
At the six-hour mark, I made the mistake of trying to test tenderness by pushing my finger onto the top, and all it did was smear off a circle of bark so there’s a little bare spot there now. Don’t do that.
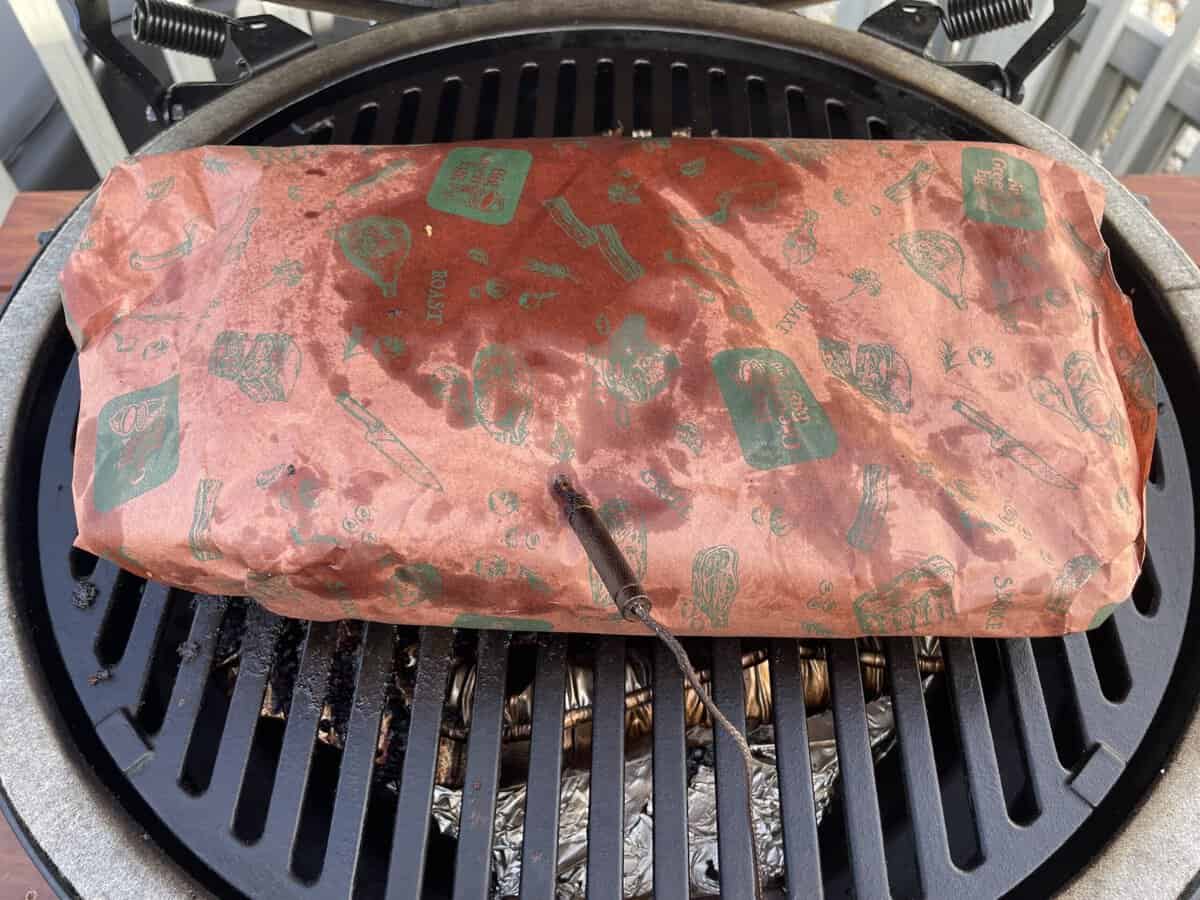
Step 8: The Wrap
At 4:15, I wrapped the brisket. I had prepared for this moment by cutting two pieces of paper, each four times as long as the brisket was wide. Then I overlapped them as per Franklin’s MasterClass instructions.
Be sure you start by extending one sheet out longways AWAY from yourself, and then overlapping the other one in a perpendicular fashion. I had flip-flopped this part so it was a little harder to flip the brisket over and tuck in the corners, but it all worked out.
After I put the wrap on and replaced the probe, the readout was back down to 165. Then I used the meat probe stick and it was mid 170s on the point side and about 162 on the flat. It seems that it wasn’t quite as hot inside as I had been seeing with the ThermaProbe the whole cook.
This is why you have to check it everywhere. Still a little rubbery, which makes sense given the temperatures. So now I went up to around 300 on the EGG and will need to race the meat temperature up past 180 and eventually to about 205-210.
I’m not worried about the brisket burning at this point, per Aaron. It’s going to get a nice, dark bark. As of 4:35 pm, the EGG gauge was steady at 295 and I was hungry.
Step 9: Rest the Brisket
At 5:20 the internal temperature was 202 according to ThermoPro, so it was time to remove the brisket from the fire.
First, I had to double-check with the meat stick. Most readouts said to take it off, at least 198 and some 205ish. But the first one showed 194, so I gave it a couple more minutes to be sure and then pulled it off at 5:25.
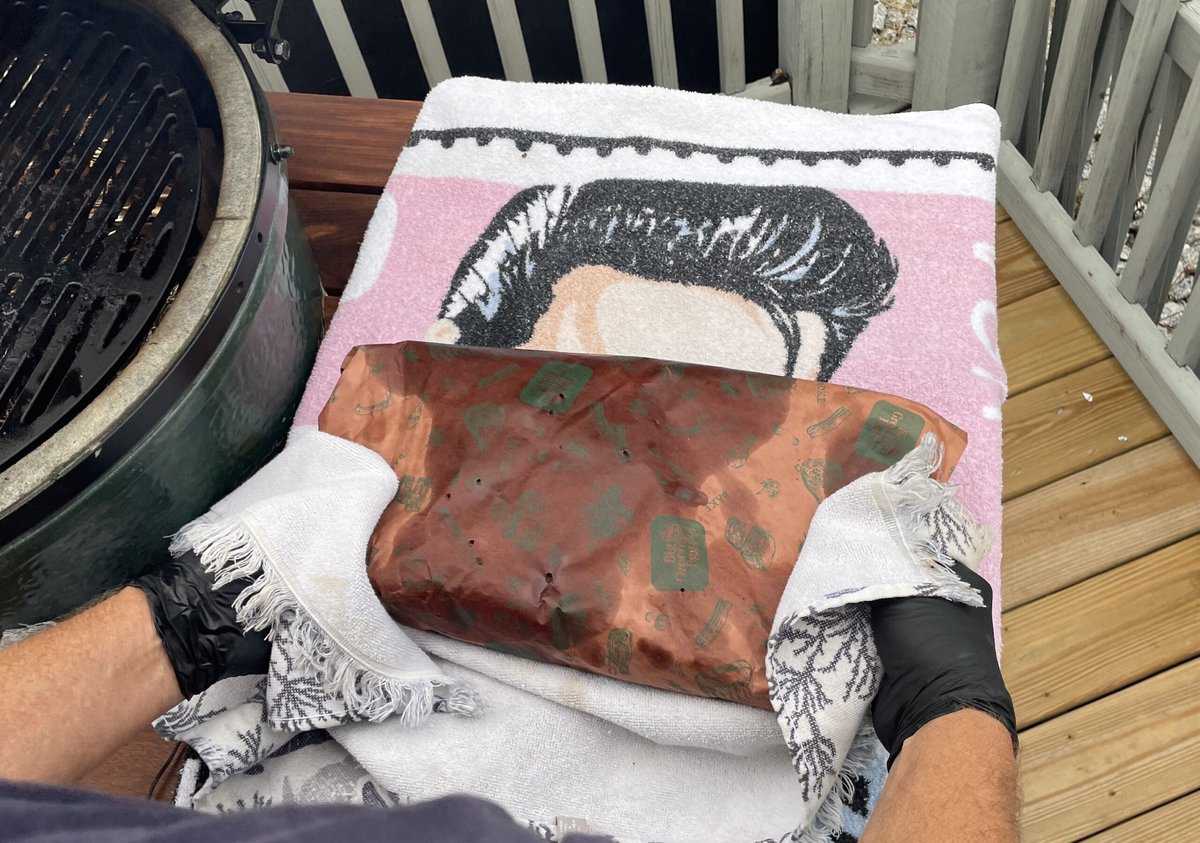
This particular brisket had the distinction of being wrapped in an Elvis beach towel, because “It’s Now or Never.” So it was wrapped within a wrap for this step. Then I placed it in a cooler per Franklin’s instructions so that it could continue to slowly tenderize inside without burning and reabsorbing moisture. Now it was a matter of waiting for the internal temperature to drop to 145.
While waiting: I hate to waste a perfect Big Green Egg fire, so as usual I added something at this stage. In this case, I took my trimmings — plenty of them — and smoked them for an additional 15 or 20 minutes so Bear is the happiest dog in the world this week. If I had a meat grinder I might use them for burgers, but Bear is king.
Finally, at around 9 p.m., the brisket is 145 degrees inside and I bring it into the kitchen. That was 12 hours of cooking. Now you can see why it’s important to back out the time, so you know to start around sunrise if you want to eat around dinnertime.
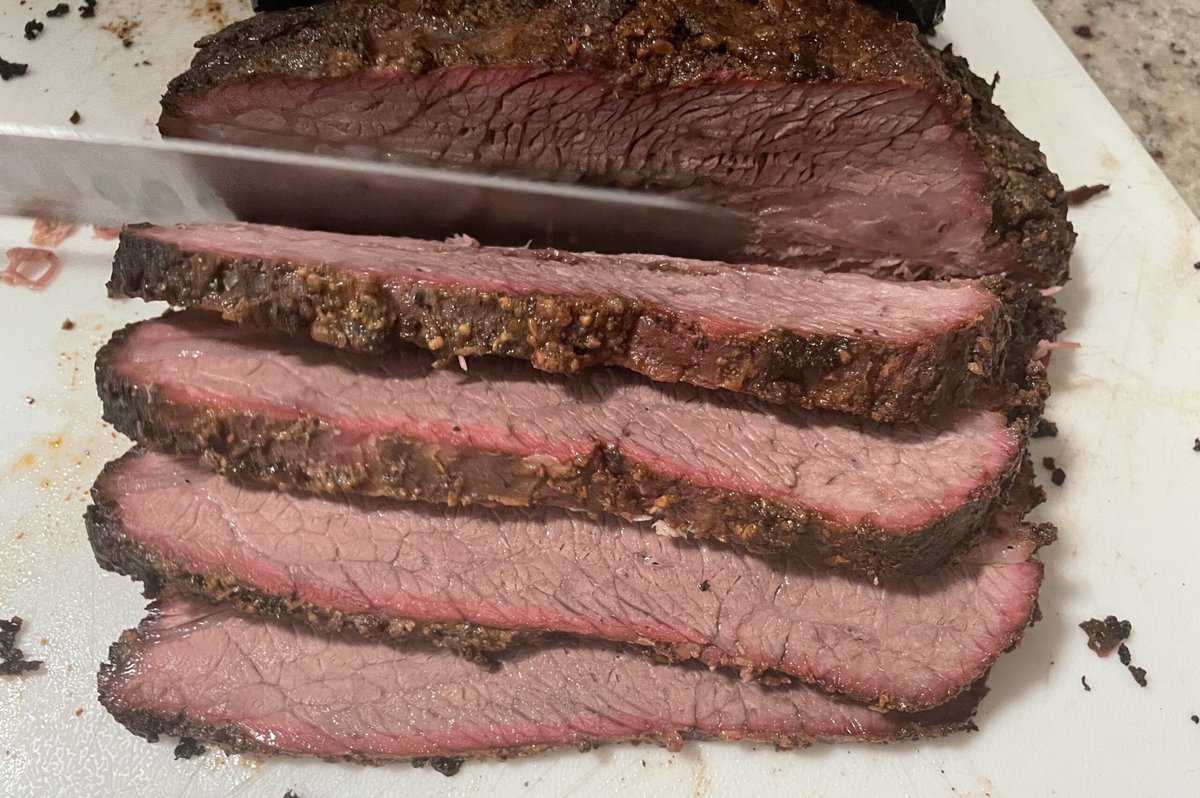
Step 10: How to Slice an Aaron Franklin Brisket
Finally, it’s time to slice, and Aaron’s “pull slice” technique is the way to go. I bought a brand brisket cutter at Ace Hardware on the morning of this cook, to make sure I follow this final step correctly.
Extend your blade out over the brisket and then pull it back in one smooth motion. That’s it. If it’s tender, it’ll cut like butter. But of course, let caution be your guide. You’re going to have greasy BBQ gloves on, and you don’t want to slip up. It’s just the way he does it.
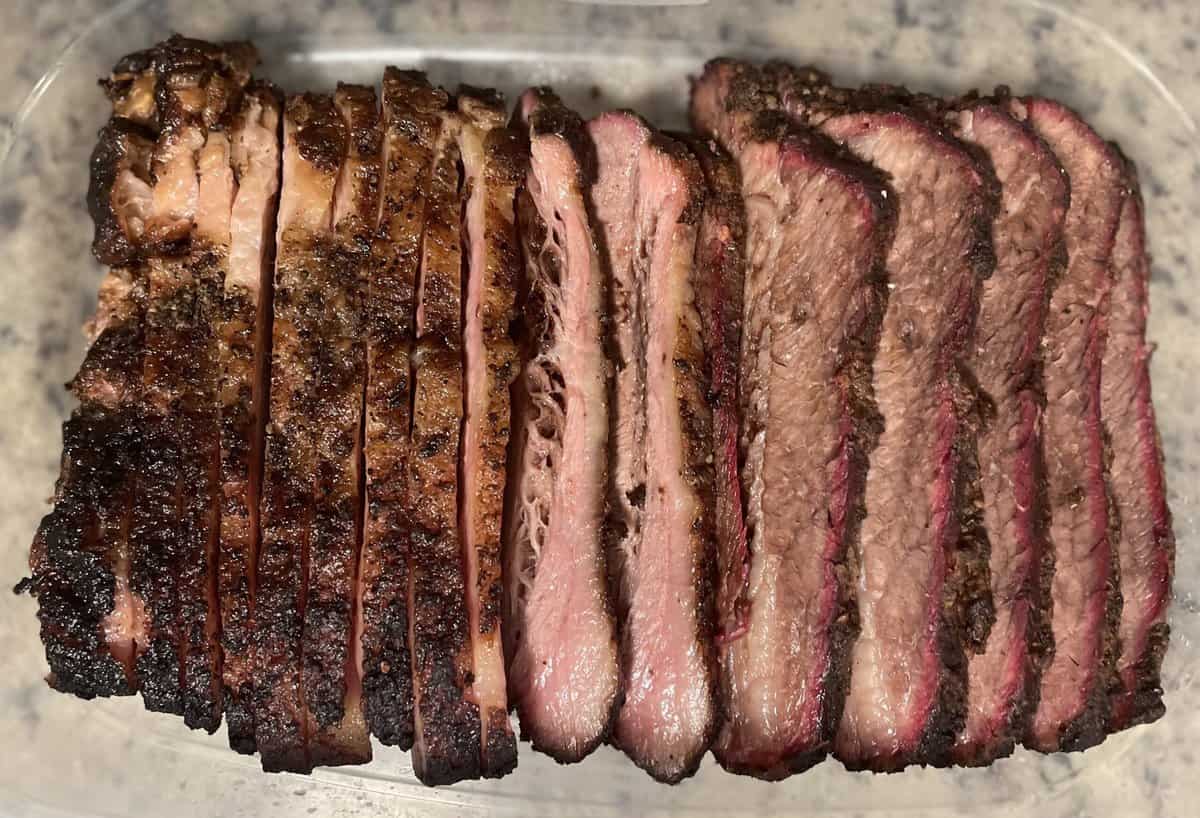
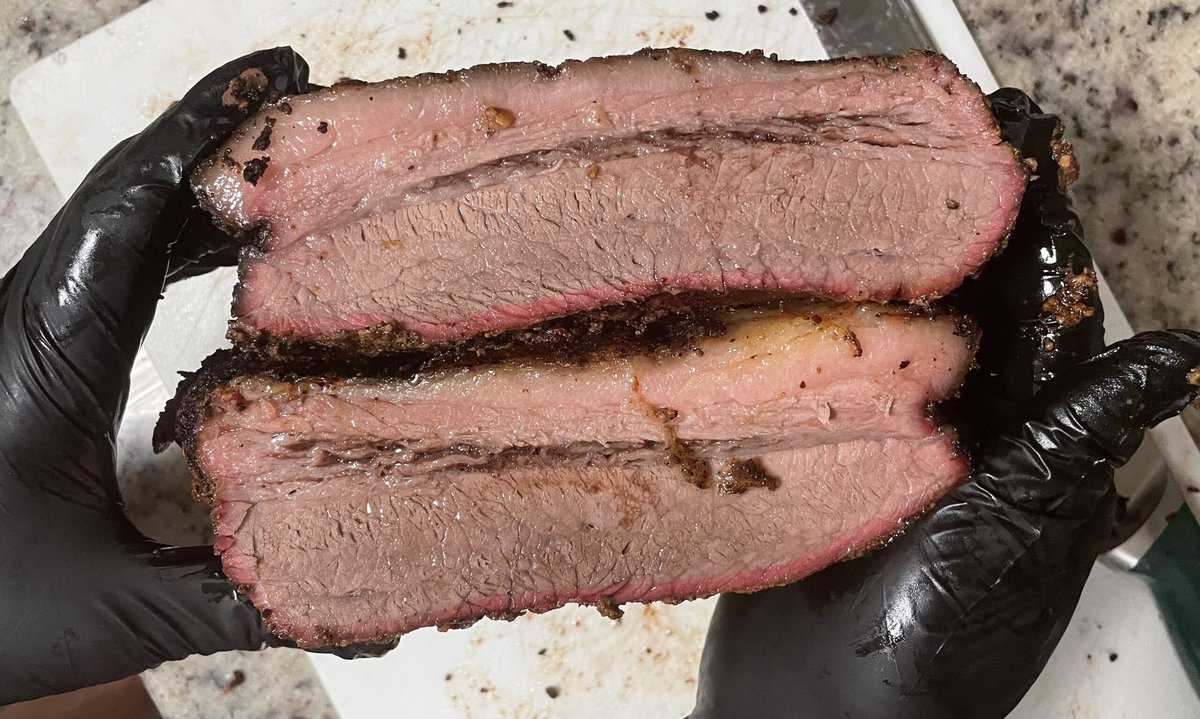
Start by slicing the brisket in half, the point on one side and the flat on the other. Give it the obligatory moisture examination and be sure to take a video of how you squish one half on top of the other so it thrills everyone with proof! Then begin slicing each half against the grain. Make 1/4 inch cuts for the fatty point side, and a little thinner on the flat.
How to Savor and Serve Your Brisket
As I reached for the first piece, I remembered this line from Aaron as he cut a strip from the wrapped brisket and let it dangle in his fingers: “A brisket under its own weight, minimal pulling.” Now prepare for the best first bite ever. I was struck by how little of the delicious meat I could actually eat at one sitting even with a voracious appetite. It is so rich and creamy, an experience like downing a big piece of buttercream cake.
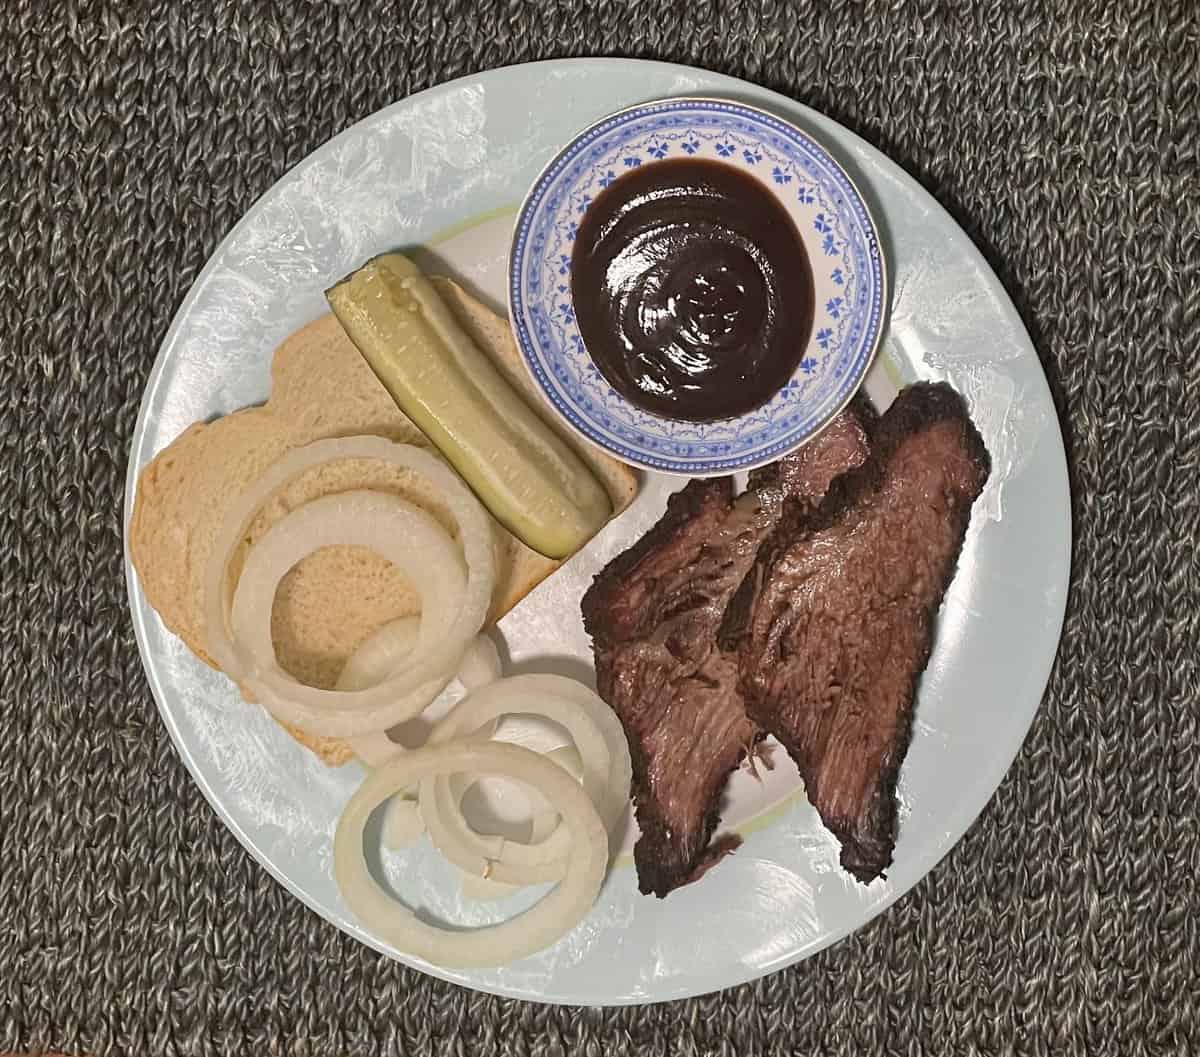
Serve it immediately with raw onion slices and white bread, no utensils.
The onion counteracts that creaminess perfectly. Barbecue sauce is not relevant to Texas briskets, and in some establishments even forbidden, but you can offer it on the side. I did this with a jug of Sonny’s Sweet from Sam’s Club, and it was heavenly. If your own Aaron Franklin Challenge goes off the rails and it’s dry as leather, then BBQ sauce is a must.
Now for maybe the most fun part of all: the distribution. I made plates to take to three different houses in our St. Pete family, and instead of aluminum foil, I wrapped each one in butcher paper with a bow on top.
It was amazing to see their reactions. Their first question was about the butcher paper, so I could explain how Franklin uses it to wrap his brisket. Bear even got to enjoy some of the best dog food anywhere after smelling this brisket all day.
Be sure to tell those people that if they refrigerate their brisket, take the time to bring it back up to that 145 range before eating it. It’s just a short time in the oven, or put it into the microwave at LOW temperature, whatever it takes to get back to that warm, moist perfection.
How to Make Your Brisket Healthier
There are a number of small things you can do to ensure the healthiest version of this brisket.
Remove as much of the fat as possible in the trimming stage, but remember that the more fat you remove, the more spritzing attention you have to give to any dry spots. You can eat only from the flat side, which is less fatty, and you can just buy a flat brisket in the first place, the way most supermarkets sell it.
Keep in mind that you’re not taking the Aaron Franklin BBQ Brisket Challenge if you do this, though. You can also dab some of the grease with a paper towel if you want to reduce the fat content. Finally, stay away from the sauce.
What I Learned From Taking the Aaron Franklin Brisket Challenge
My main takeaways were to season only with coarse salt and pepper, use dried Post Oak Wood for fuel, wrap the brisket in butcher paper during the stall, remove it around 203 degrees, don’t expect to do everything in daylight, use lower temperatures for a Big Green Egg brisket, and make as many people (and dogs) happy as possible.
This challenge is a journey like life itself: Lessons learned along the way, a demanding path to follow but a true test of your potential. Like any life journey, the best way forward is to keep a log. It’s the only way you’re going to remember the timeline and any twists and turns, so you have a record for any little changes you might want to make next time as you put your own touch on this.
Was all this worth the time? Yes. Would I do it again? Absolutely. Most of the time I was doing other things, occasionally monitoring temperatures, and keeping a log as a first-timer, so it’s a little easier than it probably looks here. Watch all the videos, read the interviews, and then take the Aaron Franklin Texas Brisket Challenge for yourself.